In this Arduino servo motor tutorial, you’ll learn how to control a servo motor using an Arduino UNO board and a potentiometer.
As soon as you’ve got this example project up and running, you’ll have the skill of controlling servo motors from your Arduino. This can be the basis for more advanced robotics projects.
Components You Need:
- Arduino Board
- 5V Servo Motor (such as the SG90)
- Potentiometer (any value from 1k and up)
- Breadboard and Jumper Wires
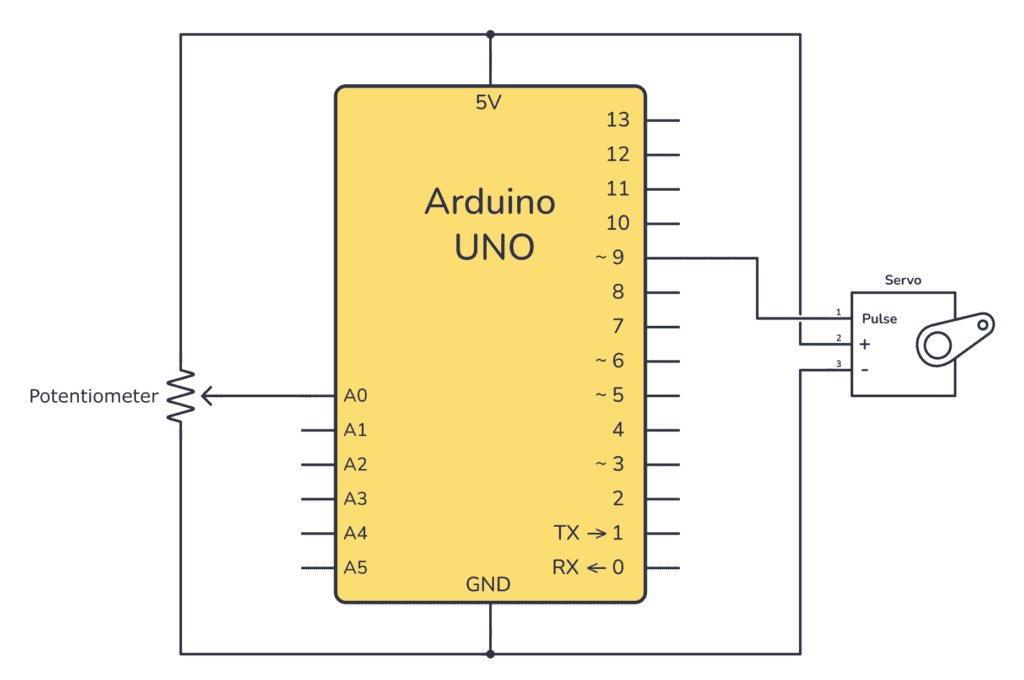
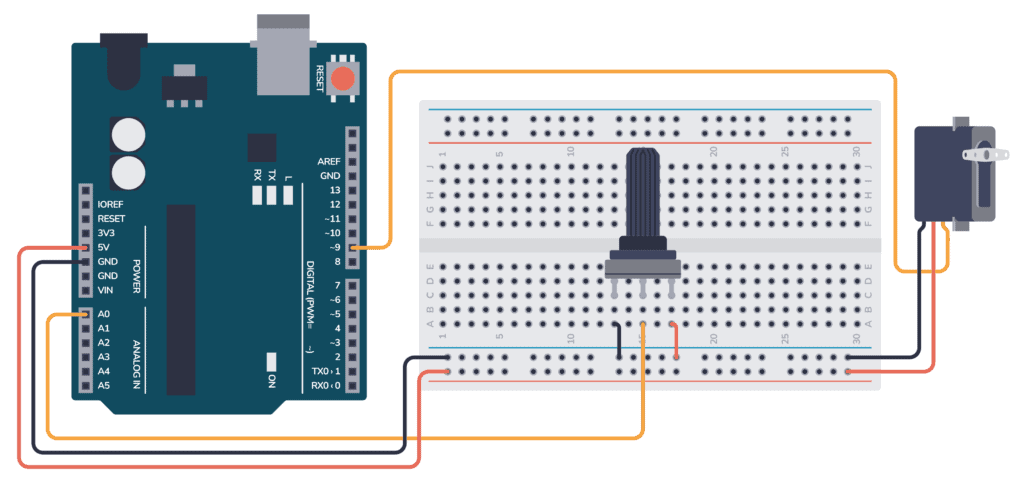
Circuit Setup:
- Connect the servo’s power cable (usually red) to the 5V output on the Arduino.
- Connect the servo’s ground cable (usually brown or black) to one of the GND pins on the Arduino.
- Connect the servo’s signal cable (usually orange or yellow) to digital pin 9 on the Arduino.
- Insert the potentiometer into the breadboard and connect one of its outer pins to 5V and the other outer pin to GND on the Arduino.
- Connect the potentiometer’s middle pin to analog pin A0 on the Arduino.
Example Code 1: Automatic Servo Movement
First, to test that the servo motor is working, upload the following test code. Once uploaded, the servo motor should start moving back and forth between 0 and 180 degrees. Make sure your servo is connected to pin 9 as shown in the circuit diagram.
#include <Servo.h>  // Include the Servo library

Servo myservo;  // Create a servo object to control the servo motor

void setup() {
  myservo.attach(9);  // Attaches the servo on pin 9 to the servo object
}

void loop() {
  // Goes from 0 degrees to 180 degrees in steps of 1 degree
  for (int pos = 0; pos <= 180; pos += 1) {
    myservo.write(pos);  // Tell servo to go to position in variable 'pos'
    delay(15);           // Waits for the servo to reach the position
  }

  // Goes from 180 degrees to 0 degrees
  for (int pos = 180; pos >= 0; pos -= 1) {
    myservo.write(pos);  // Tell servo to go to position in variable 'pos'
    delay(15);           // Waits for the servo to reach the position
  }
}
Uploading the Code:
- Connect your Arduino UNO to your computer via USB cable.
- Open the Arduino IDE on your computer.
- Copy the provided code into a new sketch.
- Select the correct board and port under the Tools menu.
- Click the “Upload” button to transfer the code to your Arduino.
Example Code 2: Controlling the Servo with the Potentiometer
This example sketch uses the potentiometer to control the position of the servo motor. When you turn the potentiometer, the servo motor should move correspondingly to the position dictated by the potentiometer’s resistance.
This code is based on the basic Arduino Potentiometer example.
#include <Servo.h>

Servo myservo;  // Servo object to control the motor
int potpin = A0;  // Where the potentiometer is connected
int val;    // Variable to read the potentiometer value

void setup() {
  // Tell the servo object which pin to use
  myservo.attach(9);
}

void loop() {
  // Read the value of the potentiometer (value between 0 and 1023)
  val = analogRead(potpin);

  // Scale it to use it with the servo (value between 0 and 180)
  val = map(val, 0, 1023, 0, 180);

  // Set the servo position according to the scaled value
  myservo.write(val);

  // Wait for the servo to reach the position
  delay(15);
}
Once the code is uploaded, turning the potentiometer will change the resistance and the analog value read by the Arduino, which in turn will control the position of the servo motor.
You can now experiment with the positions and understand how the servo motor responds to the potentiometer’s adjustments.
Troubleshooting the Arduino Servo Motor
If the servo motor isn’t responding:

Get Our Basic Electronic Components Guide
Learn how the basic electronic components work so that circuit diagrams will start making sense to you.
- Check all connections according to the schematic.
- Ensure the Arduino board is correctly selected in the IDE.
- Make sure there’s no short circuit on the breadboard.
- Make sure your servo works with 5V
Remember, practice makes perfect. Don’t hesitate to tweak the code and circuit to learn more about how they interact.
If you have any questions, let me know in the comments below!
More Arduino Tutorials
Free Course: Blinking a Light
Join my free email course on how to build a circuit that blinks a light. Enter your details below and you'll receive the first lesson right away: